ThreePipe is a modern 3D framework built on top of three.js, written in TypeScript, designed to make creating high-quality, modular, and extensible 3D experiences on the web simple and enjoyable.
Key features include:
Simple, intuitive API for creating 3D model viewers/configurators/editors on web pages, with many built-in presets for common workflows and use-cases.
Companion editor to create, edit and configure 3D scenes in the browser.
Modular architecture that allows you to easily extend the viewer, scene objects, materials, shaders, rendering, post-processing and serialization with custom functionality.
Plugin system along with a rich of built-in plugins that allows you to easily add new features to the viewer.
uiconfig compatibility to automatically generate configuration UIs in the browser.
Modular rendering pipeline with built-in deferred rendering, post-processing, RGBM HDR rendering, etc.
Material extension framework to modify/inject/build custom shader code into existing materials at runtime from plugins.
Extendable asset import, export and management pipeline with built-in support for gltf, glb, obj+mtl, fbx, materials(pmat/bmat), json, zip, png, jpeg, svg, webp, ktx2, ply, 3dm and many more.
Automatic serialization of all viewer and plugin settings in GLB(with custom extensions) and JSON formats.
Built-in undo/redo support for user actions.
Automatic disposal of all three.js resources with built-in reference management.
Realtime Realistic Rendering with screen-space post-processing effects from webgi.
Animation system(and UI) to create state, keyframe-based animations for any object, material, or viewer property with global timeline.
Checkout the documentation and guides on the threepipe website for more details.
Examples
Code samples and demos covering various usecases and test are present in the examples folder.
ViewerCanvas is the wrapper around the r3f Canvas component that initializes the ThreePipe viewer and provides the viewer context to all child components.
Any children added to this component are added to the scene model root.
Then, import the viewer and create a new instance:
import{ThreeViewer,IObject3D}from'threepipe'// Create a viewerconstviewer=newThreeViewer({canvas: document.getElementById('three-canvas')asHTMLCanvasElement})// Load an environment mapawaitviewer.setEnvironmentMap('https://samples.threepipe.org/minimal/venice_sunset_1k.hdr')// Load a modelconstresult=awaitviewer.load<IObject3D>('https://threejs.org/examples/models/gltf/DamagedHelmet/glTF/DamagedHelmet.gltf',{autoCenter: true,autoScale: true,})
That’s it! You should now see a 3D model on your page.
The 3D model can be opened in the editor to view and edit the scene settings, objects, materials, lights, cameras, post-processing, etc. and exported as a GLB file. All settings are automatically serialized and saved in the GLB file, which can be loaded into the viewer. Any plugins used in the editor can be added to the viewer to add the same functionality. The plugin data is automatically loaded(if the plugin is added) when the model is added to the scene.
The viewer initializes with a Scene, Camera, Camera controls(Orbit Controls), several importers, exporters and a default rendering pipeline. Additional functionality can be added with plugins.
Some plugins(in the plugins folder) might have different licenses. Check the individual plugin documentation and the source folder/files for more details.
Status
The project is in beta stage and under active development.
Many features will be added but the core API will not change significantly in future releases.
The DNSPod User API OR DNSPod中文文档 is restricted to individual users, making it easier and more flexible for users to manage their own domain names and records.
//Get the API version numberecho$DP->getVersion();
//Get the level allowed line$domain = 'example.com';
echo$DP->getRecordLine($domain);
//Get a list of domain namesecho$DP->getDomainList();
//Construct a new record table$name = 'example.com';
$type = 'A';
$value = '255.255.255.0';
$DP->newRecords($name, $type, $value);
There are two different ways to test the gRPC service. One is with a postgis docker container and the other is with a docker-compose db+service. Both require this initial set of commands.
Initial commands will download a gig or more of shapefiles to your local machine and prepare a database:
Test version 2; test with docker-compose initialized with a pg_dump file:
export PG_DB_DATA=naip_visual_db-$(date +%Y-%m-%d)# dump postgres table to file
docker exec naip-metadata-postgis pg_dump -U user -Fc \
-t naip_visual testdb > ./$PG_DB_DATA
docker stop naip-metadata-postgis
docker-compose up --build -d
# wait for postgres db to initialize. you could omit the `-d` and # watch for the initialization completion and execute the rest of # the command from another window
sleep 15
docker exec -i naip-stac-grpc-db-c pg_restore -C --clean --no-acl --no-owner \
-U user -d testdb < ./$PG_DB_DATA
pip3 install -r requirements.txt
python3 test_client.py
There are a couple of distinctions from the STAC definitions.
there isn’t a properties container on the item result object. It could be added, but for the purposes of the demo it made it more difficult.
there isn’t a bands array on the item result object.
Protobuf Reserved Field Numbers
Protobuf definitions have fields that are indexed by field numbers. As we want people to extend STAC for there own purposes the field numbers 201 to 500 are available for custom definitions. The field numbers from 1 to 200 and from 501 to max are reserved for STAC definitions. More keys could be released as needed.
proto2 vs proto3
There are two different versions of the proto file format, proto2 and proto3 that are currently in use. For the message response, the stac_item_result.proto is defined for proto2. In protobuf, messages are like structs. They must have a default value even if that value hasn’t been set, and in the name of compactness that value is 0. In proto2, the version
of our proto file for results, there is a method that allows you to check whether a field has been set (this is absent from proto3). That way you can ignore values that are 0, but doesn’t represent the data. If the HasField method returns false, the data should be ignored. HasField, is a poor name, because there is still a field there is data, it’s just the data isn’t set by the creator of the message.
Geometry
This stac experiment imports a geometry proto definition used in another gRPC project. One of the aspects of this geometry definition is that you can define your aoi geometry using a wkt, wkb, geojson or esrishape. GeoJSON shouldn’t be the only option, especially if a user wants results that are more compact. By default this project returns wkb for compactness, though it can accept wkt or wkb as an input.
Project Setup
Requirements
install requirements:
pip3 install -r requirements.txt
Protoc Compile Step (Optional)
The repo contains compiled python files generated from the included proto file definitions. If you choose to make changes to the proto files you’ll need to compile the proto files to python code. The generated code is in the epl/grpc and the epl/protobuf directories.
after compiling the proto files included above , install the packages:
python3 setup.py install
Postgres Setup
You need an AWS account with s3 requester pays read access. ogr2ogr with Postgres plugin is required for writing data to DB. Docker is required for running the DB.
AWS Setup: ~/.aws/credentials with aws_access_key_id and aws_secret_access_key. NAIP bucket is requester pays.
GDAL + ogr2ogr + postgresql:
brew install gdal2 --with-postgresql
To collect all the data data from the AWS NAIP shapefiles (a gig or more) you’ll need to execute the included bash script, naip_import_aws.sh.
Testing
Once the naip_import_aws.sh script is finished and you have the database up and running you can run the tests. From within the repo directory you can call pytest to run all tests. There will be some warnings, from psycopg2 but beyond that all tests should pass.
pytest
To test the service you can open a terminal and run python3 service.py and from another terminal run python3 test_client.py, or run the jupyter notebook from the repo.
gRPC services, protobuf binary, and the proto files that define them can be used separately, but they were designed to be used together for microservices communication. They are part of an open source intiaitive from Google. They’re based off of Google’s own internal RPC framework, Stubby. More info can be found here:
# In any valid CEP extension folder:
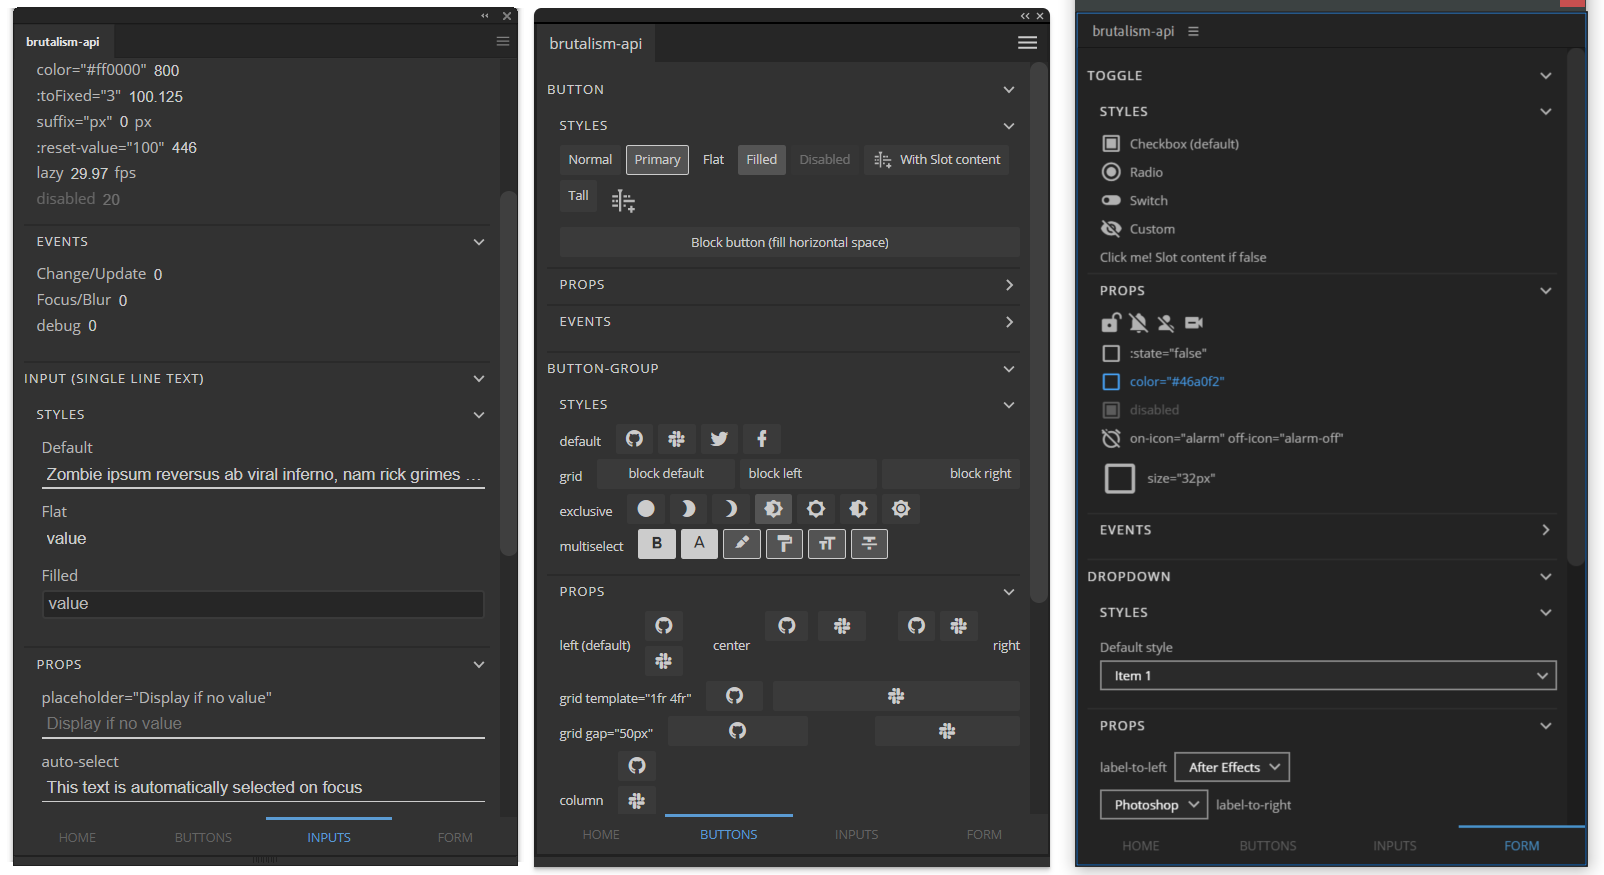
git clone https://github.com/battleaxedotco/brutalism-api.git
NOTE: This panel is meant to be an example to use alongside your own. It does not require npm run serve and is already in Production context to allow you to run your own alongside it in Developer context (localhost:8080).
NOTE: The panel cannot interact with the host app while in browser. Script loading and style is given a fallback (second parameter for returned data in evalScript, uses default or defined app/theme/gradient props for Panel component to determine style) while in browser.
You can use the ./.certignore file (especially with src included) to manually ignore any specific files or folders during staging
I’m getting a “require is not defined” error
If in Adobe context and not browser, make sure your target and node lines in ./vue.config.js are not commented out.
Panel style isn’t working (especially for Animate)
Ensure that starlette is version 1.0.2 or greater.
Due to Issues #265 and #266 for Animate, <Menus> is automatically given a Switch Theme option for Animate only. The user will need to manually trigger Switch Theme if the host theme is set to dark or light, but all future instances of the panel launch will remain in this theme.
Panel is not updating
Scripting files are not a part of hot-reloading and are loaded into memory at your extension’s mounted lifecycle. You will need to Refresh panel in a menu for them to be updated.
Adding or reorganizing components may cause hot reloading to fail. Many times you will be warned of this in CEF debug‘s console, fix this by hitting ^C in your active terminal to Terminate batch job, then run npm run serve once more and refresh the panel.
Page Not Found (cannot find page at localhost:#### displays in panel)
Must run npm run serve and have the App running at: -Local / -Network message in your terminal
If you launched the app before running npm run serve, click the localhost URL inside the panel’s error message
Panel is white or blank
Check your CEF client via localhost:#### for an error thrown in your code which breaks the panel’s rendering
If in Production context and receiving 404 errors in your index.html, ensure your dist/index.html‘s script tags have src attributes such as src=./filepath or src=filepath instead of src=/filepath (leading slash is default but will break, should be fixed via vue.config.js)
Sign/Certify is failing
Including hidden files and repositories in your ZXP/ZIP will cause a misleading error message. Be sure to delete hidden items such as node_modules/, .git/, and any other hidden files/folders prior to your sign/certify if not including these in your ./.certignore file.
If you want to have a Web-Service to deliver the image we built our own one. Just head to CALE.es and make an account.
This video of UsefulElectronics will help you to get started.
If you are using raw parallel Eink displays in your project we highly recommend trying this new component FastEPD
ESP32C3 /S3 also works as a target. Please check also config-examples/C3-riscv-spi where is a PIN configuration that is prove to be working. Then just select one of the SPI examples, and do a:
idf.py set-target esp32c3
idf.py –preview set-target esp32s3 (Only v4.4 since tried this only with beta3)
Cale-idf is the official ESP-IDF firmware of our Web-Service CALE.es and also the repository where the development of CalEPD epaper component takes place. The main class extends Adafruit GFX so this library has full geometric functions and also fonts including German/Spanish/French special characters support.
VSCODE and Platformio
In the repository cale-platformio you can have a quick start skeleton to use CalEPD and Adafruit-GFX components, along with optional FocalTech touch I2C. Please be aware that there are some corrections to do by hand until we figure out what is the best way to do it. Read those in the WiKi and please give a ★ to the cale-platformio repository if you find it useful
News
We are working in a interesting new PCB design to make a smart switch using this component. If you are interested please check our repository Bistable-smart-Switch and don’t be shy, give it a ★ if you like it.
A full pfleged version that supports WiFi provisioning using ESP-Rainmaker app is updated on the branch feature/50-idf-v5-rainmakerNote: It needs an external submodule component so don’t forget to run:
Please note that parallel driver epdiy is not anymore a requirement and after last update epdiy V6 is not part of this repository, only linked as a git submodule. So in case you want to use our experimental implementation in C++, please pull the git submodules:
git submodule update --init --recursive
Also please notice that if you need to exclude any of the components, like for example epdiy or any other, the fastest and most straigh-forward way is to open the CMakeLists of that component and add as the first line:
return()
That will make this component not to get in the build process.
If you are not using EPDiy to drive your epapers, this step is not needed. If you are, please go to:
CalEPD/CMakeLists.txt
And enable epdiy in the REQUIRE section and the related classes:
# Uncomment for parallel epapers:
"epdParallel.cpp"
"models/parallel/ED047TC1.cpp"
"models/parallel/ED047TC1touch.cpp"
"models/parallel/ED060SC4.cpp"
# Add more if you need to copying one of the existing, since not all eink sizes are supported
Additional features
CalEPD has also support for FocalTech and L58 I2C touch panels used in Lilygo parallel epaper EPD047, enabling you to make simple UX interfaces using small epaper displays. This is optional and can be enabled only when the Firmware requires touch.
Please check the Wiki for latest news and to see what displays are supported. The Wiki is the perfect place to make updates that are not branch dependant so our documentation efforts will be focused there.
CalEPD supports currently the most popular epaper sizes and four color models (4.2, 5.83, 7.5 and 12.48 inches).
Use develop to try the latest features. Only after days or even weeks of testing, it will be merged in master, and eventually land in a new CalEPD epaper component release
If you are interested in LVGL / UX please check our project lv_port_esp32-epaper. In this experimental LVGL esp32 fork we are exploring the possibility to make UX in fast paralell displays.
Please do not Fork this repository to bookmark it. For that use the ★ Star button. Acceptable forks fall in this three categories:
You found a bug and want to suggest a merge request. Then Fork it!
You will contribute adding a new epaper model that does not exist or add a new functionality to an existing one.
You will use Cale-idf as a base to create something new. But in that case it would be better to fork the components.
This advice is because we don’t like having copies of the whole repository without any reason. But it does not interfere in any way with the Apache License that clearly states that you might reproduce and distribute a copy of this component provided you agree with the terms mentioned there.
Requesting for new models
If your epaper model is not there just open an Issue and send us one epaper with the SPI interface. If we can make a working implementation and new C++ class then you can use it in your Firmware and we keep the eink as a payment for our effort. If we fail and cannot make a working implementation then it comes back to you at no cost.
Also following existing classes you can do it yourself. Just check on the pull requests to see how other developers did to add their epapers!
CALE Firmware
CALE does only 3 things at the moment and is very easy to set up:
It connects to cale.es and downloads a Screen bitmap.
In “Streaming mode” it pushes the pixels to Adafruit GFX buffer and at the end renders it in your Epaper.
It goes to sleep the amount of minutes you define in the ESP-IDF menuconfig
It wakes up after this deepsleep and goes back to point 1 making it an ideal Firmware if you want to refresh an Events calendar or weather Forecast display. It does not need to be tied to our CALE service. You can use your own full url to your bitmap image. We just recommend to use CALE.es since you can easily connect it to external APIs and have a living epaper. Optionally you can do the same, but with a JPG, using our www-jpg-render example. Please note that in many cases you will require an ESP32-Wrover or similar with PSRAM.
Different cpp examples:
cale.cpp Main example to use with monochrome or 3 color epapers from Goodisplay/Waveshare
cale-grayscale.cpp Example only to use with PlasticLogic epapers, serves as footprint to do it with other models
cale-sensor.cpp Same as cale.cpp but it has a sensor interrupt when a GPIO goes HIGH (Rising) this triggers a new image request
cale-7-color.cpp Example to retrieve an 4 bits image and send it with up to 7 colors the 5.65 Acep epaper
Best settings on CALE.es website that we found to display color photos with cale-7-color is to use Dither mode: 3×3 and Bits per pixel: 24. This is downgraded to 4bpp using dithering but that’s really ok since 16 colors are more than the epaper supports. It’s not a great photo quality but this epapers where designed to make labels and supermarket prices, not to display quality color pictures.
ROADMAP
2023.Still adding some Goodisplay epapers. Introduction of setMonoMode (to add 4 gray mode in certain models)
2022.Performance optimization and research in parallel eink drivers
2021.Oct→Dec Testing other projects and small pause (Lot's of other work that are not electronics related...)
2021.Aug→Oct Imaging libraries: Adding JPG support and optimizing processes
2021.Jun→Aug Parallel interaction research: UX on epaper displays
2021.Mar till June Enabling touch support to enable UX design in ESP32
2020.Sep Optimizing instantiation and configuration
2020.Aug Adding color epapers 5.83 and 7.5 inches
2020.Jul Added PlasticLogic as a new brand with 4 wire SPI (uses MISO)
EPDiy it’s our own fork of the parallel epaper component EPDiy with only the directory structure to use it as an IDF component
They are at the moment included without git submodules so we can develop fast without updating them all the time. But they are also available to be used as your project ESP-IDF components.
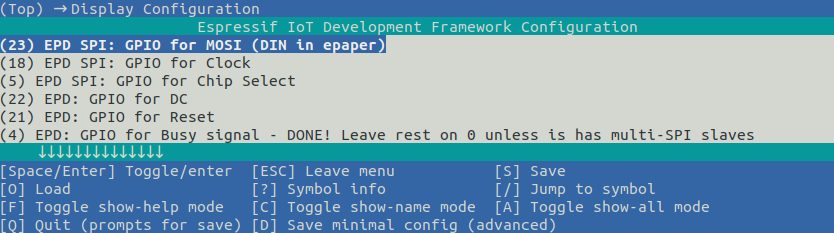
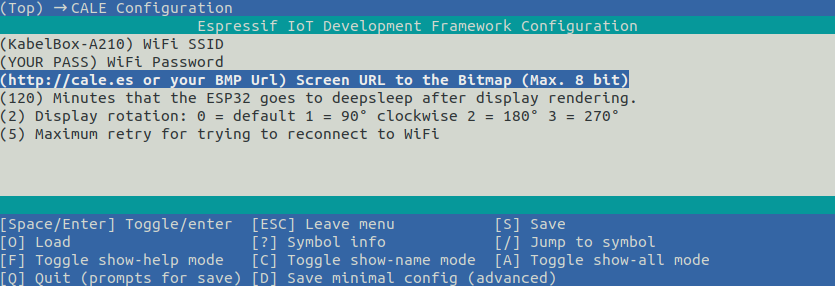
Configuration
Make sure to set the GPIOs that are connected from the Epaper to your ESP32. Data in in your epaper (DIN) should be connected to MOSI:
And then set the image configuration and deepsleep minutes. Here you can also set the rotation for your Eink display:
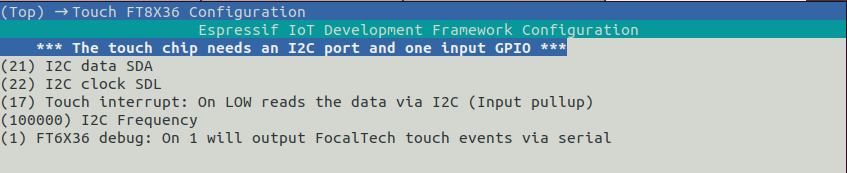
Optionally if you use touch, for example with 2.7 inches gdew027w3-T epaper, you should configure also FT6X36 Gpios:
Needs 3.3v, a common GND, SDA, SCL for I2C communication, and a input INT pin that signalizes on Low that there is touch data ready.
CalEPD component
CalEPD is an ESP-IDF component to drive epaper displays with ESP32 / ESP32S2 and it’s what is sending the graphics buffer to your epaper behind the scenes. It’s designed to be a light C++ component to have a small memory footprint and run as fast as posible, leaving as much memory as possible for your program. Note that the pixels buffer, takes 1 byte to store 8 pixels on each color, so depending on your epaper size may need external PSRAM. Up to 800 * 480 pixels on a monochrome eink it runs stable and there is still free DRAM for more.
Branches
master… -> stable version (ChangeLog moved to Wiki)
refactor/oop -> Making the components base, most actual branch, where new models are added. Only after successfull testing they will be merged in master. Inestable branch do not use on Firmware that you ship to a client.
tft_test -> Original SPI master example from ESP-IDF 4 just refactored as a C++ class. Will be kept for historic reasons
Epaper demos
Open the /main/CMakeLists.txt file to select what is the C++ file that will be compiled as your main program. Just uncomment one of the SRCS lines:
idf_component_register(
  # Main CALE
  #SRCS "cale.cpp" -> CALE Firmware for IDF
   SRCS "demo-fonts.cpp"
  #SRCS "demo-epaper.cpp"
  INCLUDE_DIRS ".")
This configuration will just compile the Fonts demo to test your epaper display. Use cale.cpp if you are looking forward to compile our CALE Firmware. This is the ESP-IDF version of that Eink-calendar esp32-arduino Firmware. In CALE.es there is a web-service that can help you making dynamic Screens for your epapers.
Fonts support and German characters
Please check Adafruit page on adding new fonts as a start. In order to add the whole character range, you need to set from -> to ranges after calling font convert. Just go to the /components/Adafruit-GFX/fontconvert directory and run:
Be aware that PROGMEM is not supported here since we are not in the Arduino framework. So just remove it from the generated fonts.
As an example with all characters including German umlauts ( ä ö ü and others like ß) I left Ubuntu_M18pt8b ready in the Fonts directory. Be aware that using the whole character spectrum will also take part of your programs memory.
Submodules
Not being used at the moment since all test and development happens here. Only when there are new working models they will be pushed as new release in the component repository:
CalEPD epaper component is published on version 0.9
ESP-IDF uses relative locations as its submodules URLs (.gitmodules). So they link to GitHub. To update the submodules once you git clone this repository:
git submodule update --init --recursive
to download the submodules (components) for this project.
Reminder for myself, in case you update the module library just execute:
# pull all changes for the submodules
git submodule update --remote
Compile this
If it’s an ESP32:
idf.py set-target esp32
If it’s an ESP32S2:
idf.py set-target esp32s2
Make sure to edit Display configuration in the Kconfig menuoptions:
idf.py menuconfig
CALE configuration is the section to set the bitmap URL (non-ssl for the moment), deepsleep until next refresh, and optional display rotation
And then just build and flash:
idf.py build
idf.py flash monitor
To clean and start again in case you change target (But usually no need to run)
idf.py fullclean
To open the serial monitor only
idf.py monitor
Please note that to exit the monitor in Espressif documentation says Ctrl+] but in Linux this key combination is:
Ctrl+5
config-examples/
In the config-examples folder we left samples of GPIO configurations. For example:
Wave12I48 has the GPIOs ready to use w/Waveshare socket for ESP32-devKitC
S2 has a sample GPIO config to be used after idf.py set-target esp32s2 (Only for S2 chips)
SPI speed
If you instantiate display.init(true) it activates verbose debug and also lowers SPI frequency to 50000. Most epapers accept a frequency up to 4 Mhz.
We did this on debug to be able to sniff with an ESP32 SPI slave “man in the middle” what commands are sent to the display so we can detect mistakes. Even if you print it, is not the same as to hear on the line, this is the real way to reverse engineer something. Hear what the master is saying in a library that works.
+    uint16_t multiplier = 1000;
+    if (debug_enabled) {
+        frequency = 50;
+        multiplier = 1;
+    }
Due to restrictions in C++ that I’m not so aware about there is a limitation when using big integers in the structs { }
So SPI frequency is calculated like:
spi_device_interface_config_t devcfg={
    .mode=0,  //SPI mode 0
    .clock_speed_hz=frequency*multiplier*1000,  // --> Like this being the default 4 Mhz
    .input_delay_ns=0,
    .spics_io_num=CONFIG_EINK_SPI_CS,
    .flags = (SPI_DEVICE_HALFDUPLEX | SPI_DEVICE_3WIRE),
    .queue_size=5
};
Feel free to play with Espressif IDF SPI settings if you know what you are doing 😉
Multi-SPI displays
A new breed of supported displays is coming being the first the Wave12I48 12.48″ b/w epaper from Waveshare.
This is the first component that support this multi epaper displays abstracting their complexity so you can treat it as a normal 1304×984 single display and use all the Adafruit GFX methods and fonts to render graphics over it.
Please note that this big display needs a 160 Kb buffer leaving no DRAM available for anything more on your ESP32. So you can either make a very simple program that renders sensor information, or do everything you want, but adding PSRAM for the GFX buffer. Think about ESP32-WROOVER as a good candidate.
Watchdogs feeding for large buffers
In Buffers for big displays like 800*480 where the size is about 48000 bytes long is necessary to feed the watchdog timer and also make a small delay. I’m doing it this way:
+    // Let CPU breath. Withouth delay watchdog will jump in your neck
+    if (i%8==0) {
+       rtc_wdt_feed();
+       vTaskDelay(pdMS_TO_TICKS(1));
+     }
Again, if you know more about this than me, feel free to suggest a faster way. It’s possible to disable also the watchdogs but of course that is not a good practice to do so.
References and related projects
CALE.es Web-service a Web-Service that prepares BMP & JPG Screens with the right size for your displays
This is the beginning, and a very raw try, to make CALE compile in the Espressif IOT Development Framework. At the moment to explore how difficult it can be to pass an existing ESP32 Arduino framework project to a ESP-IDF based one and to measure how far we can go compiling this with Espressif’s own dev framework.
UPDATE: Saved for historical reasons. After starting this project I heavily adopted ESP-IDF as an IoT framework and toolsuit to build firmares. This become also the start of CalEPD that is our own IDF component to control Epapers with ESP32 / ESP32S2.
Credits
GxEPD has been a great resource to start with. For CalEPD component, we mantain same Constants only without the Gx prefix and use the same driver nomenclature as GxEPD library, just in small case.
Strange-v for the creation of the FocalTech touch library, that I forked to make the FT6X36-IDF component.
Hats off to Jean-Marc Zingg that was the first one to make such a great resource supporting so many Eink displays. Please note that there are no plans to port this to Arduino-framework. This repository was specially made with the purpouse to explore Espressif’s own IoT development framework.
Thanks to all the developers interested to test this. Special mentions for @IoTPanic, Spectre and others that pushed me to improve my C++ skills.
Sponsoring
If you like this component and it made your life easier please consider becoming a sponsor where you can donate as little as 2 u$ per month. Just click on:
❤ Sponsor on the top right
We are also launching a new company called Marespa.es that will help EU citizens find an affordable apartment in Spain. With the price of Rent going through the roof in 2024, this might be the moment to make an investment, if you plan to work from the spanish coast. With this project we are also supporting our open source projects.
We are thankful for the support and contributions so far!
Hier bei EasyFlick und auf der EasyFlick Homepage findest du alle möglichen Downloads zu Minecraft Ressourcenpaketen, Wallpapern und anderen Dingen. Viel Spaß!
Was gibt’s denn hier Schönes?
EasyFlick ist ein Netzwerk mit vielen verschiedenen Möglichkeiten in Richtung Gaming, Coding oder auch mal Dokumentationen mit Tipps und Tricks.
Minecraft
- Selbsterstelle Ressourcenpakete
- Eigene Plugins
- Texturepacks
- und vieles mehr...
Wir haben natürlich auch einen Discord, deswegen kommt gerne auf den Discord.
Dort gibt es viele nette Menschen und eure Fragen werden hier am schnellsten beantwortet! Außerdem

- einen eigenen Discord Bot
- Zocken mit Freunden
- Minigames wie TicTacToe
- Musikbots
- und natürlich einen schnellen Support!
Auf der Homepage gibt es die ganzen Downloads zu den besagten Projekten.
Support oder Kontakt
Du hast ein Problem mit einem unserer Dienste oder möchtest eine Frage loswerden? Dann komm doch gerne auf den EasyFlick Discord! Dort kannst du im extra dafür angelegten Support-Channel nachfragen. Oder du schreibst eine E-Mail an fab3F@programmer.net
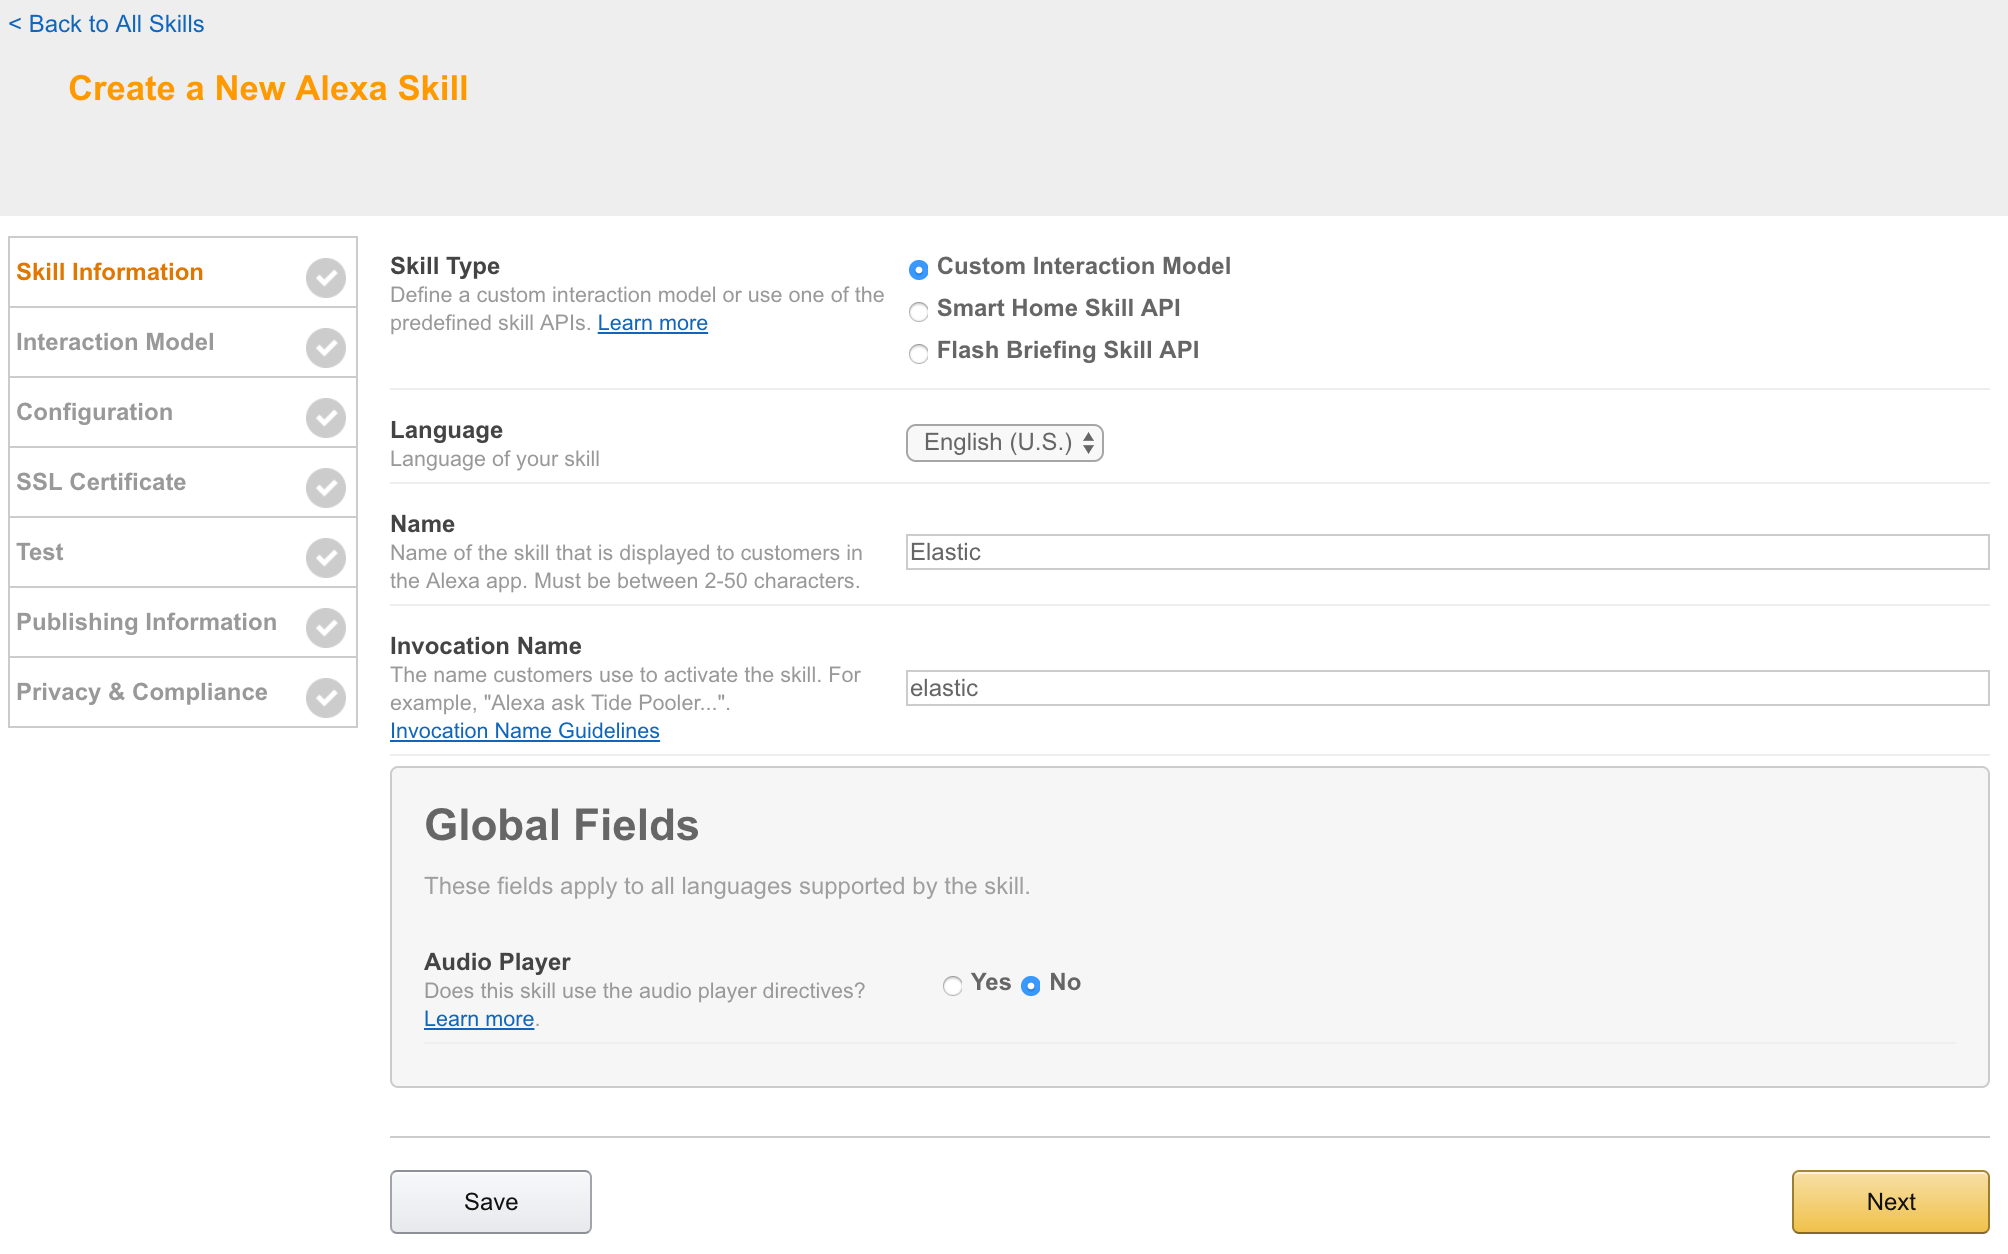
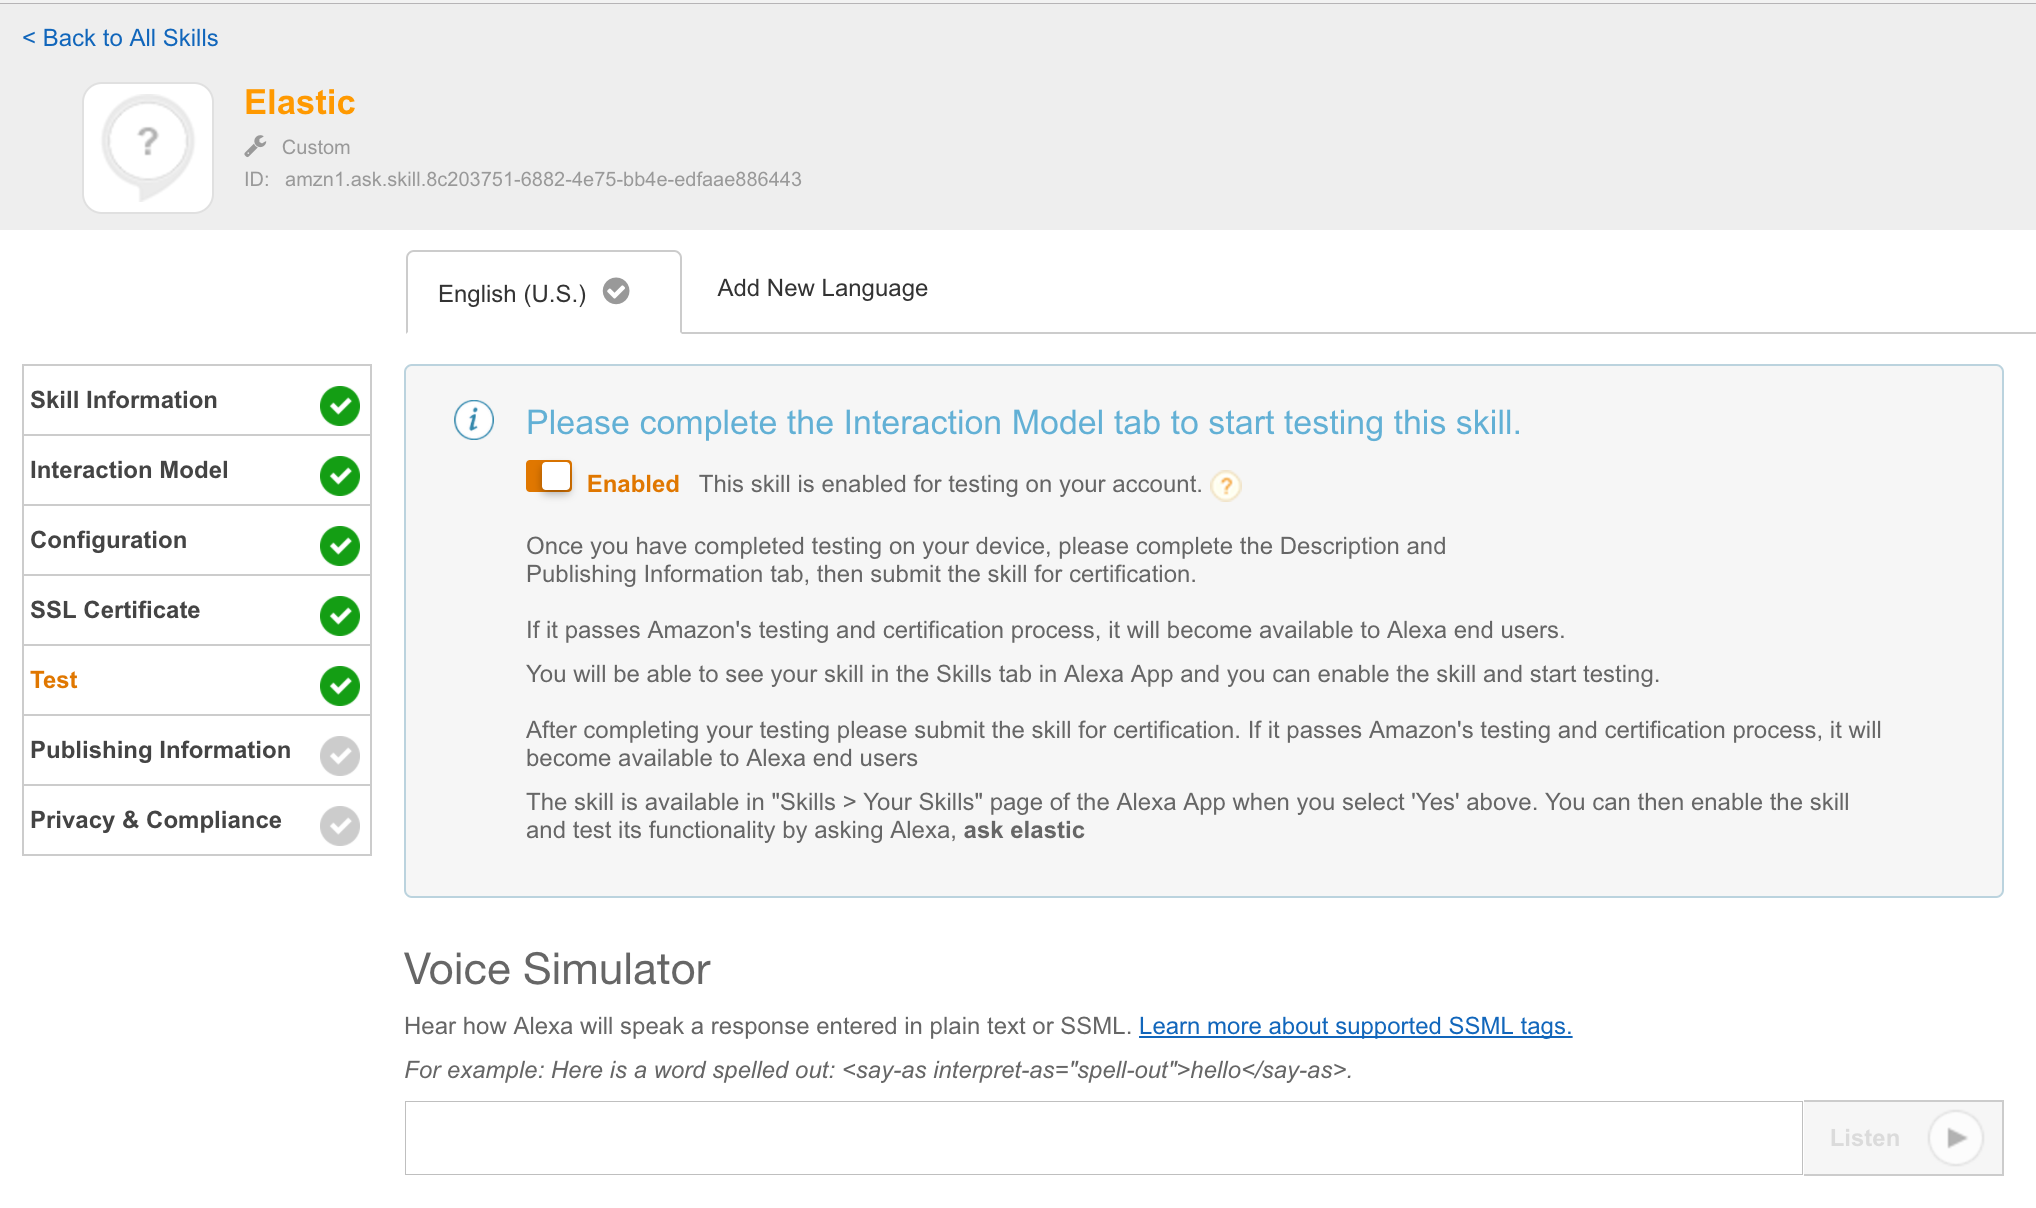
Skill for Amazon echo to enable Alexa to talk to Elasticsearch.
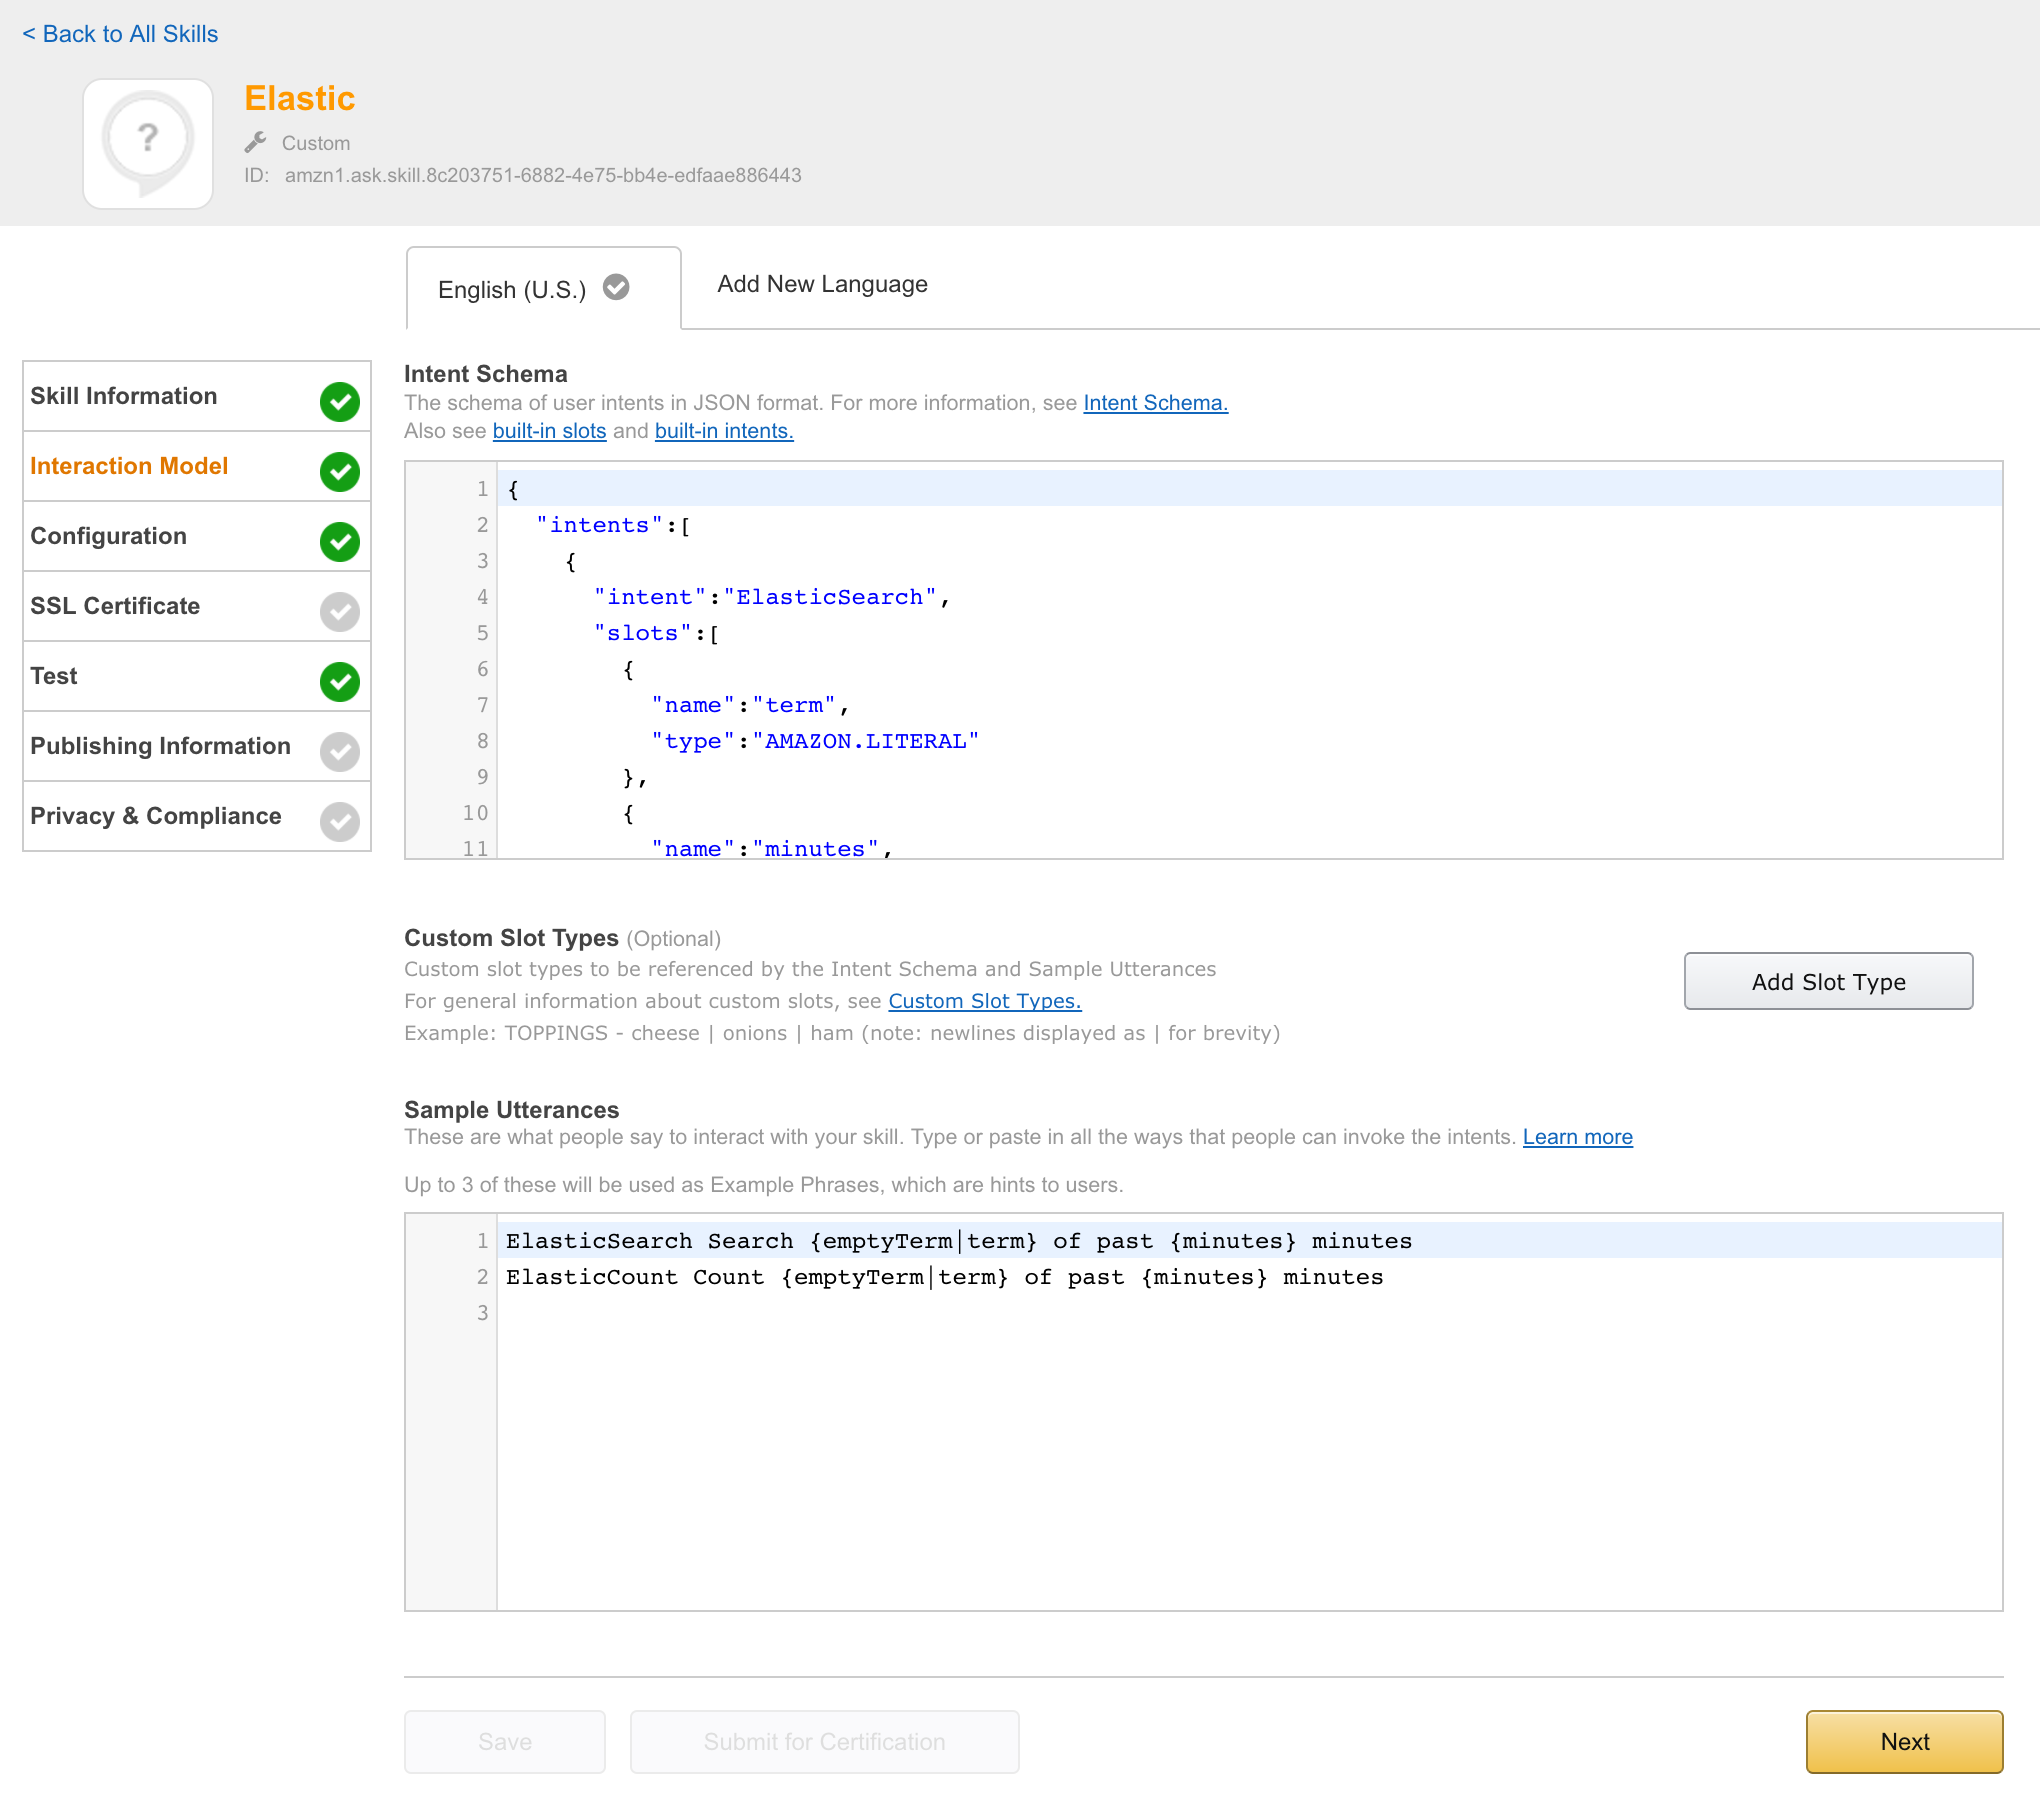
Current possible interaction
Configured IntentSchema:
ElasticCount Count {emptyTerm|term}
Explanation:
Search for term in elasticsearch and count result set
Example:
Alexa? Ask Elastic to count error
is transformed to skill (intent) and variable configuration (slots):
intent=ElasticSearch
slot(term)=error
Note: Data type number can be translated from five to 5 directly.
Java application called by alexa
Amazon provided a nice SDK and a nice way to interact with alexa. After registering your skill to amazon developer console, your endpoint get called with relevant payload. I decided to use a spring boot application handling these requests. Java code is in src, relevant business logic is included in
Currently you need to configure the target ElasticSearch cluster within code. This should be changed to be configured during installing this skill to amazon echo, see section Option issues.
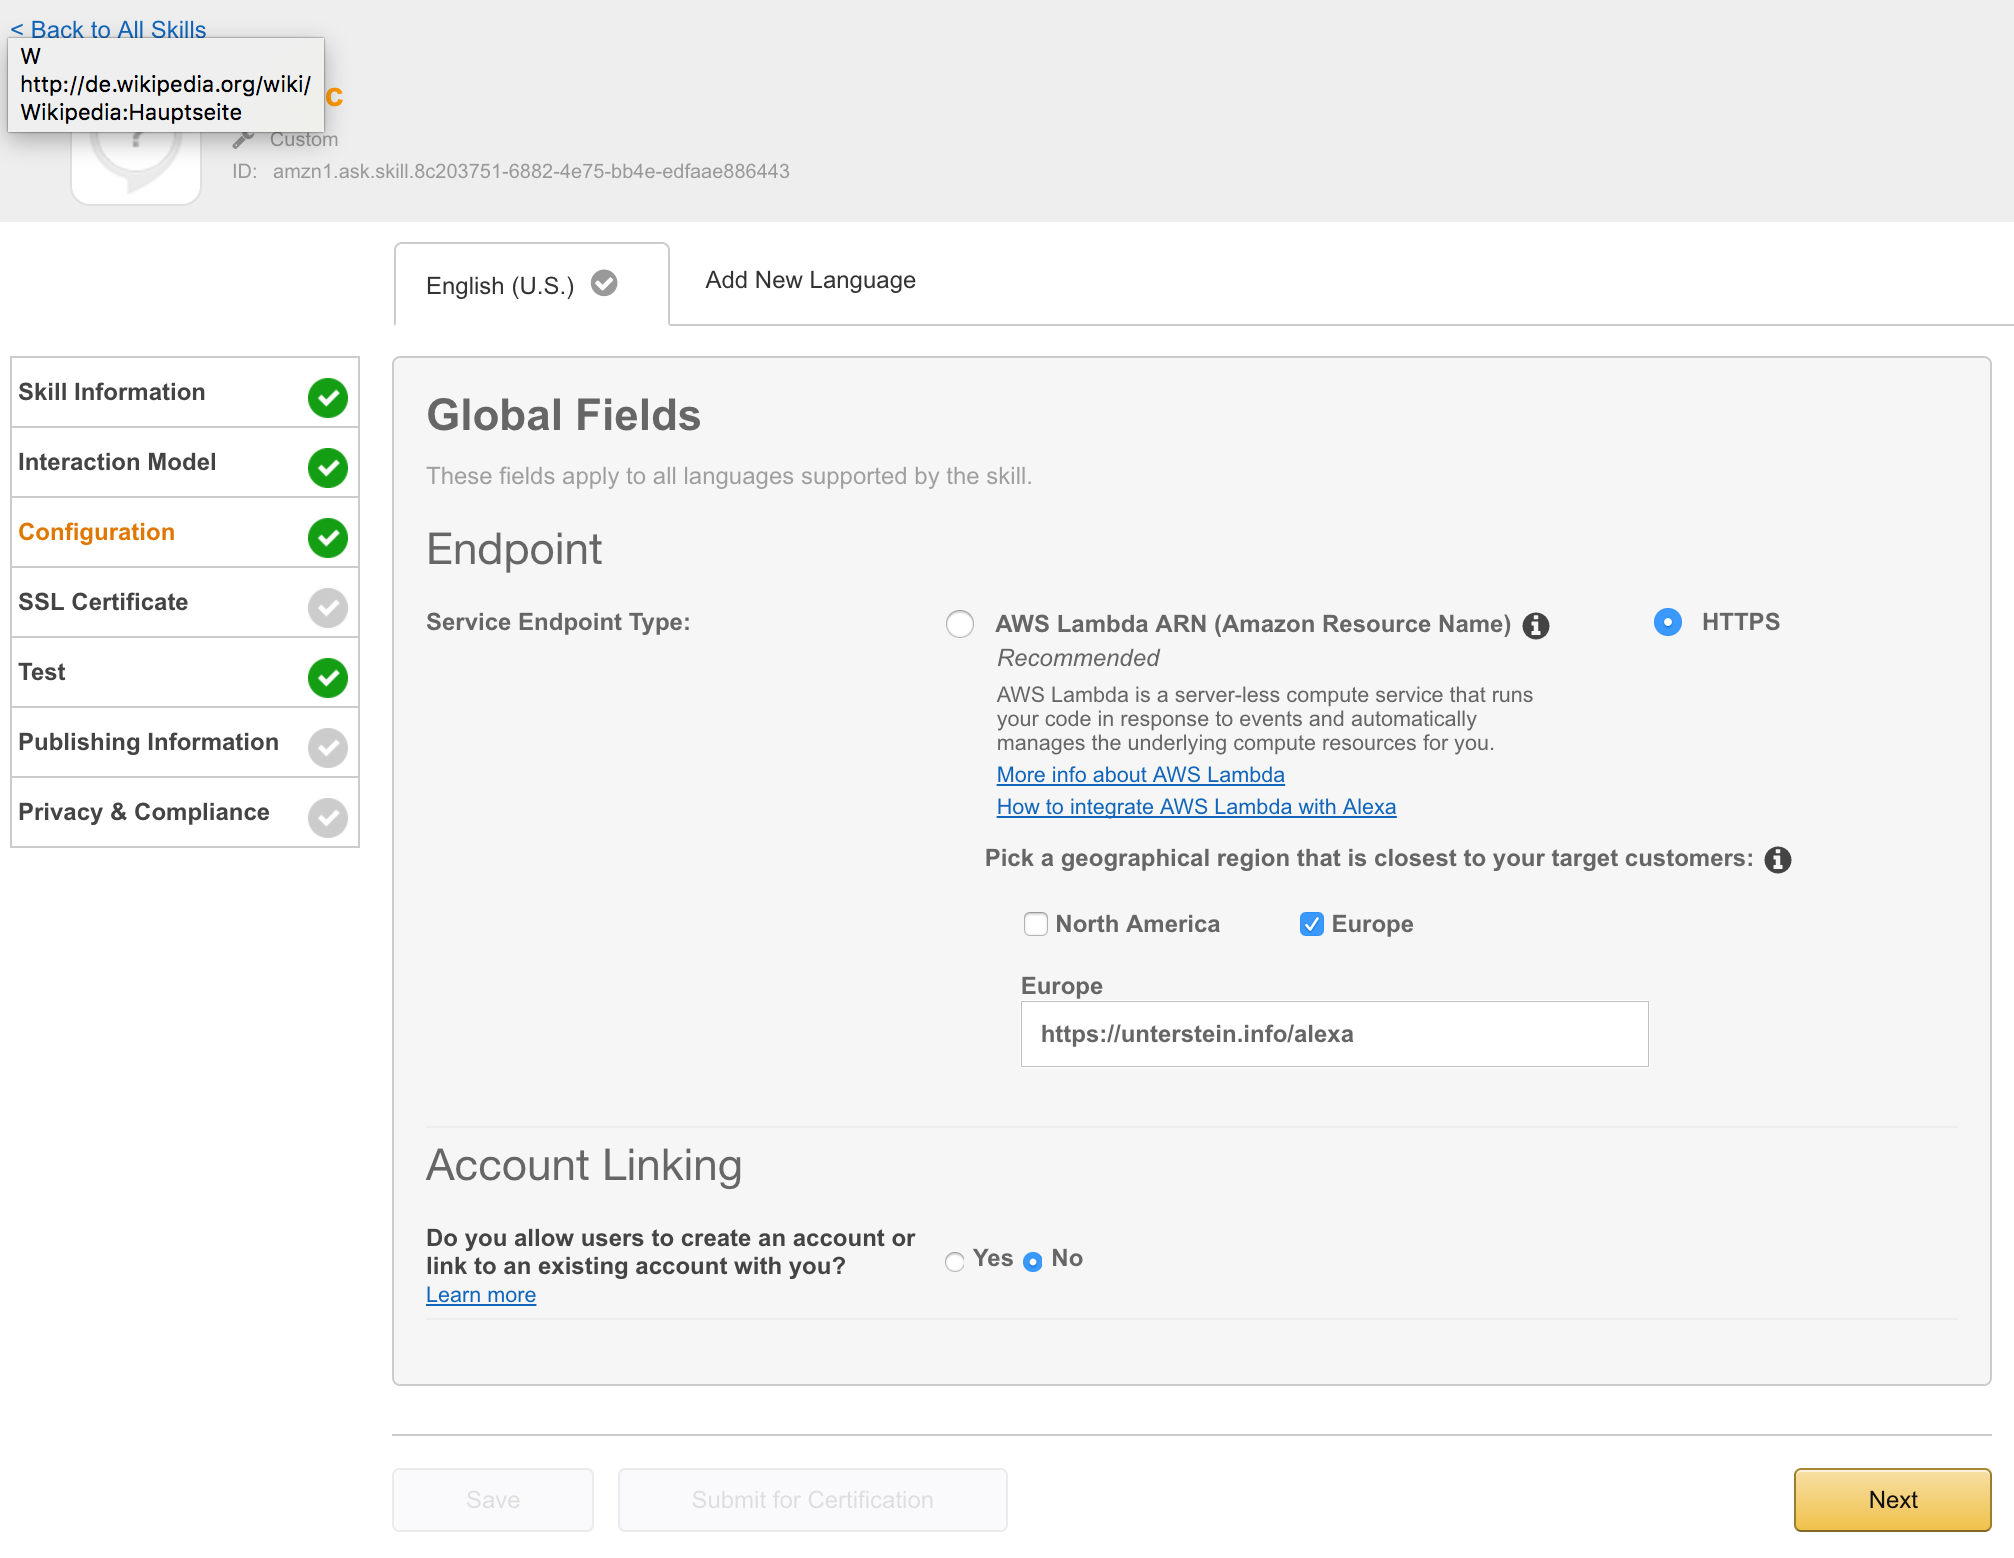
But, for now, you need to go to
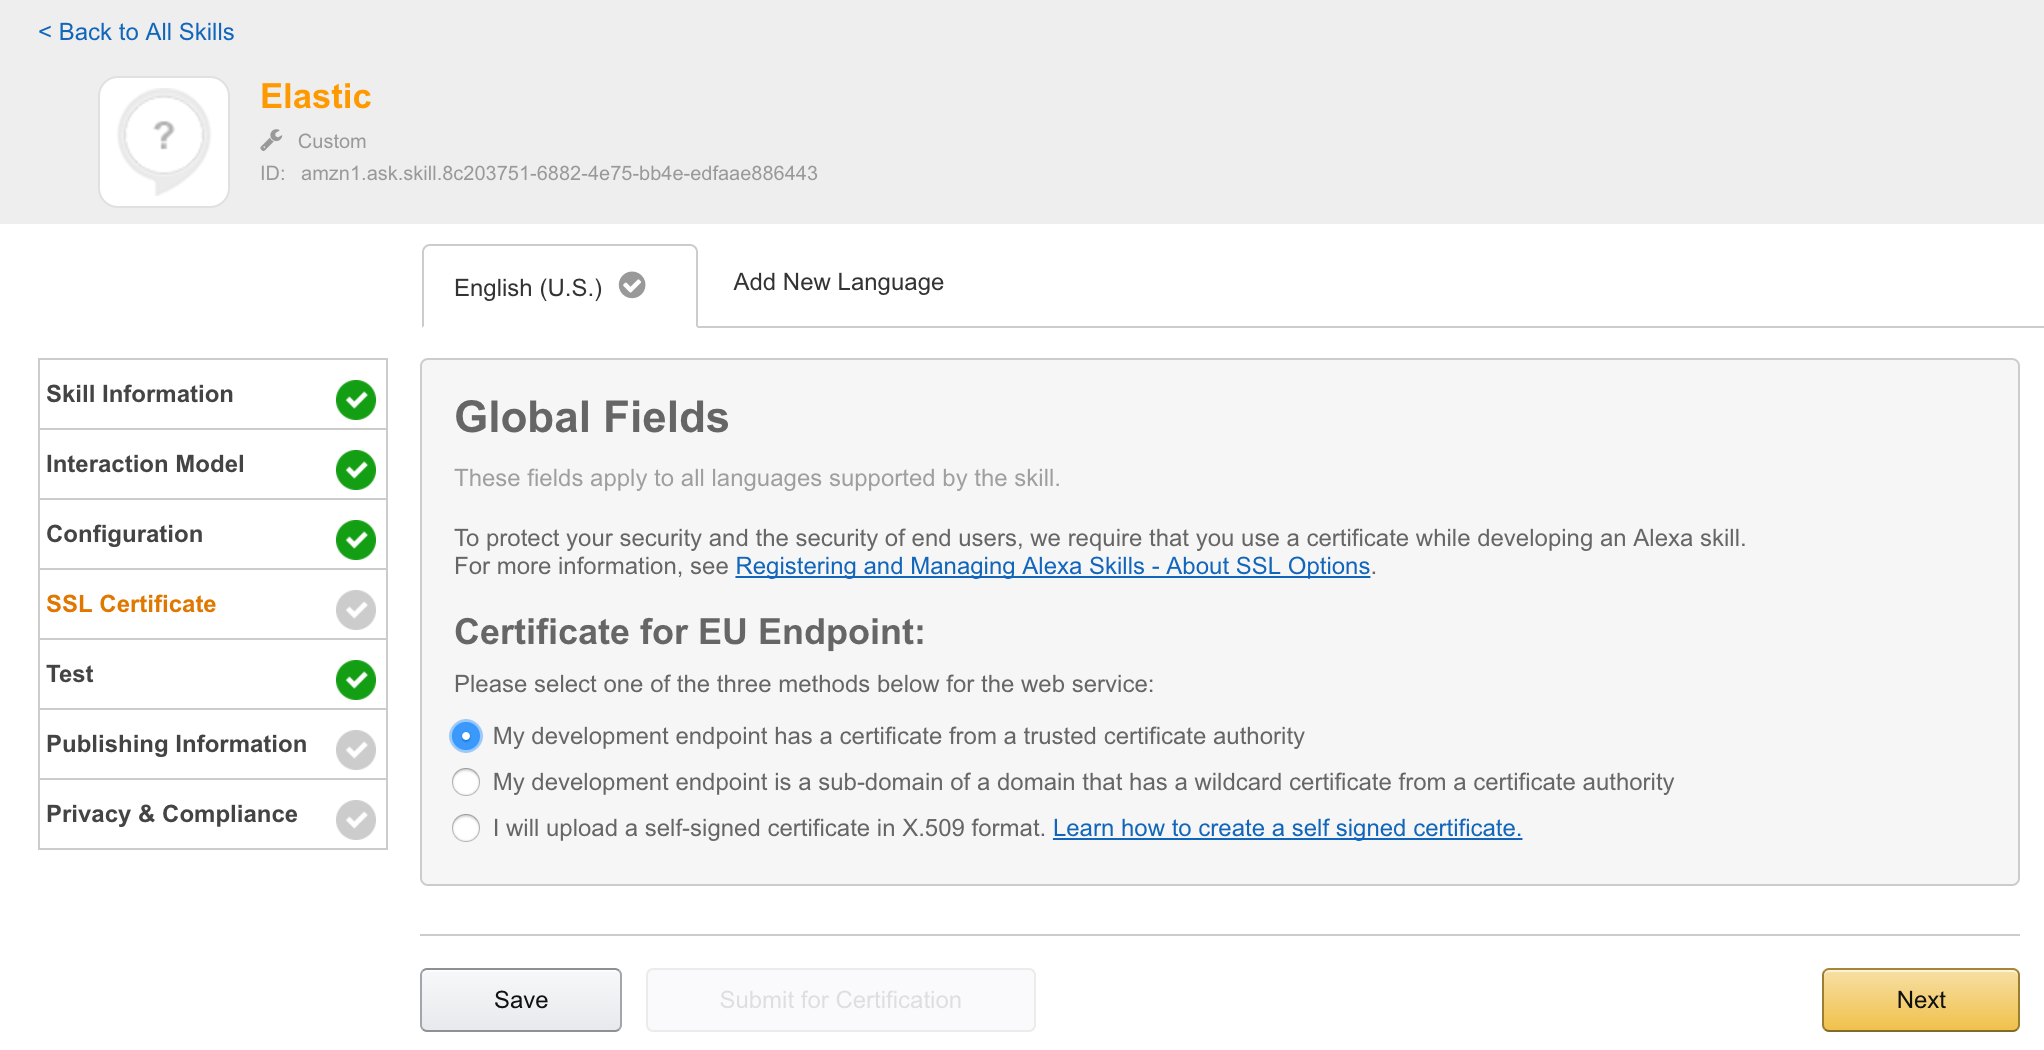
I needed an http endpoint with valid ssl certificate. You can choose between onprem installation or AWS lamba. I decided to deployed the app directly to my server, proxied behind NGINX using the following configuration:
Make skill configurable so that each user (amazon account) can configure his own ElasticSearch cluster and credentials during skill installation. Currently all users of this skill would talk to the same ElasticSearch cluster, which is .. not really cool :-/
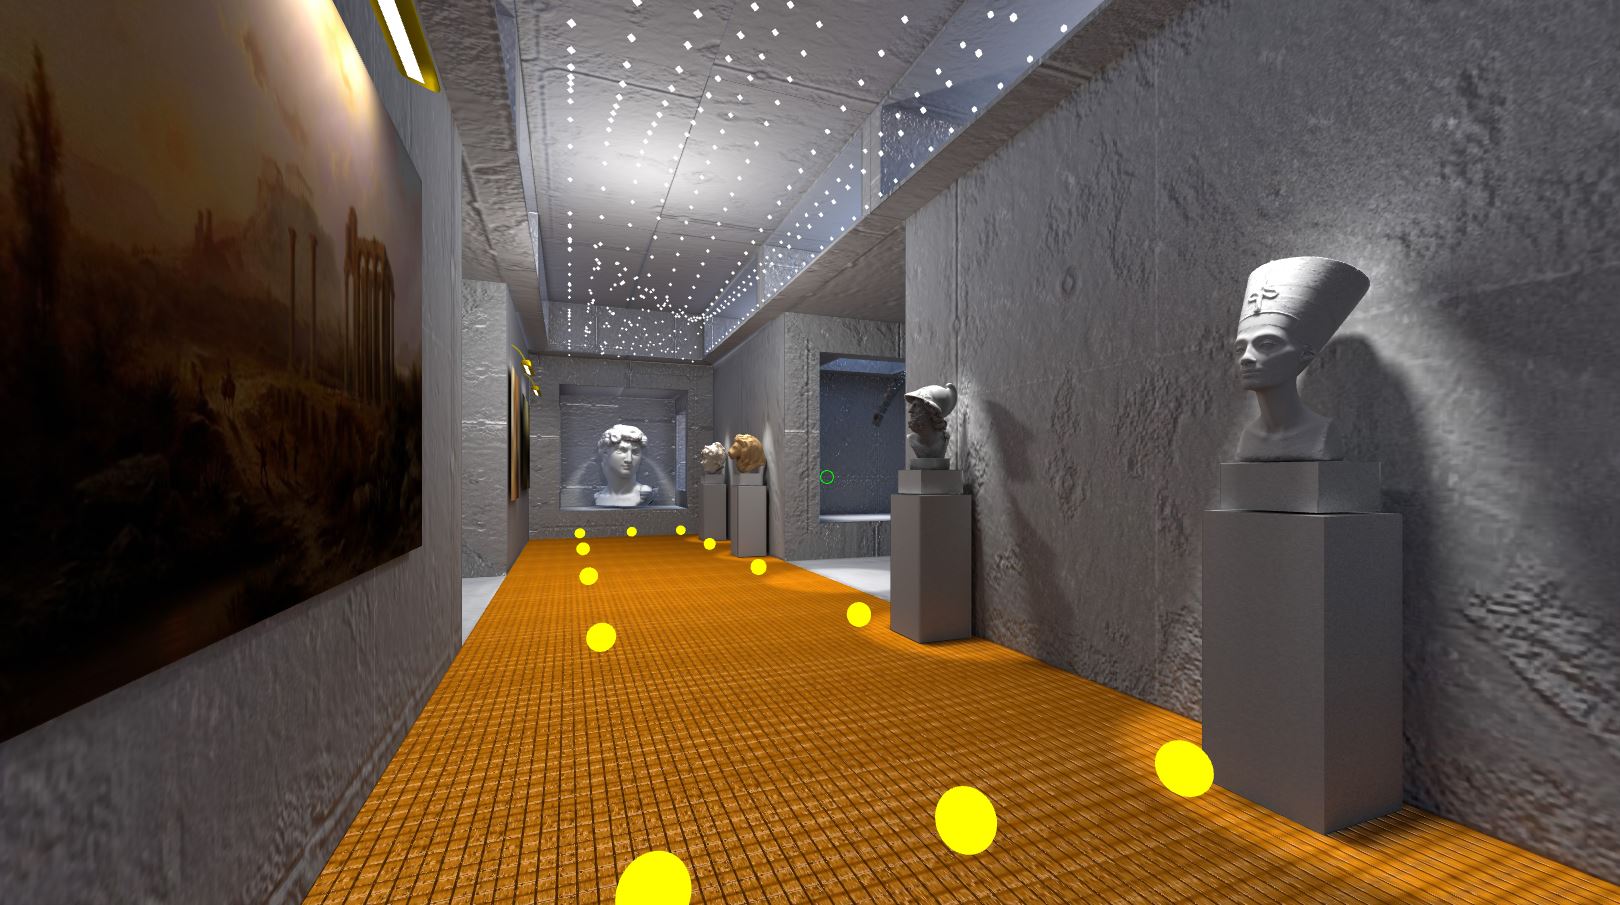
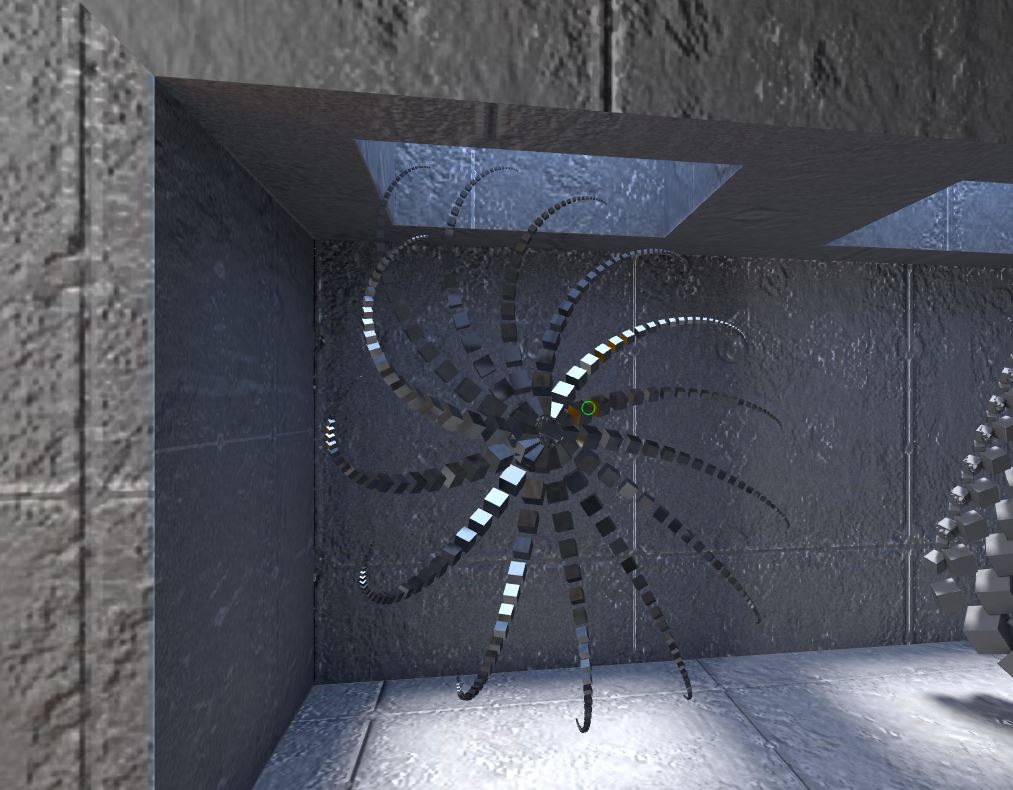
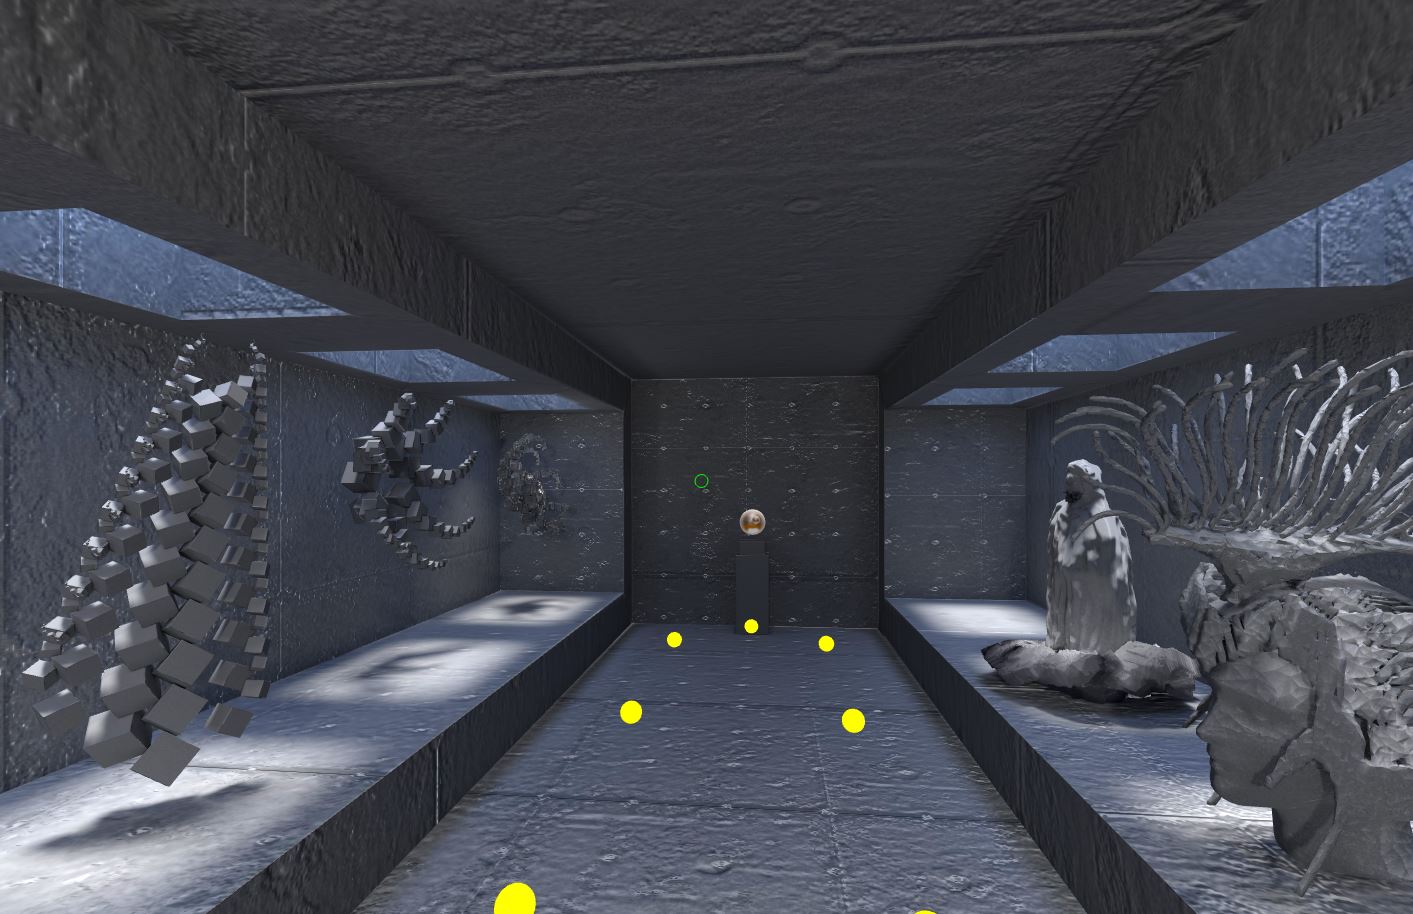
The Hall is a demo created in Cecropia Solutions to test the WebVR capabilities.
The project has a variety of art items in display. Some custom, some of free access and use.
Navigation
The main are the Teleport Spots, yellow dots on the floor to jump quickly jump to location of interest using the gaze pointer (green circle).
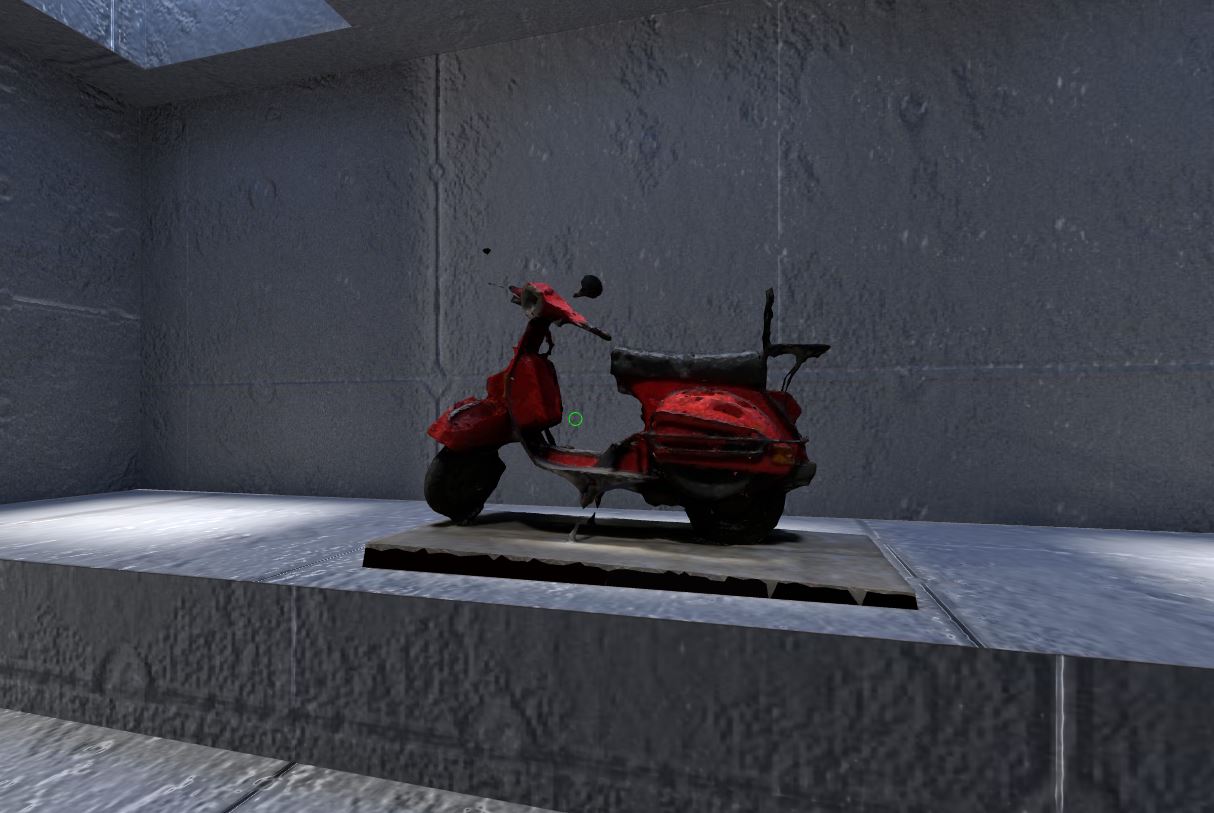
Development process
The object modeling and texture baking was created in Blender, where the 1m unit is used as base size; the models are exported individually, converted to CTM and loaded into the application via Three.js.
A couple of the models were created with Oculus Medium and later decimated with Meshlab.
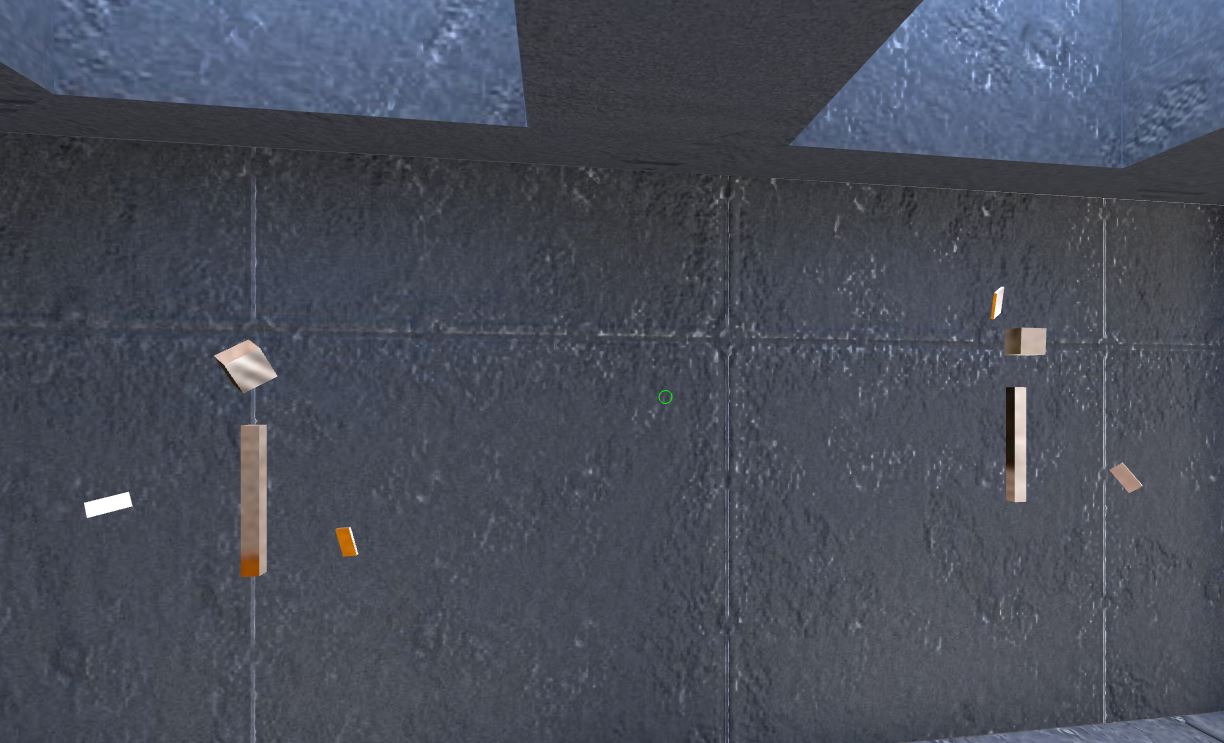
A couple of Kinetic Sculptures were created directly with Three.js and a bit of Math knowledge.
The Hall is a demo created in Cecropia Solutions to test the WebVR capabilities.
The project has a variety of art items in display. Some custom, some of free access and use.
Navigation
The main are the Teleport Spots, yellow dots on the floor to jump quickly jump to location of interest using the gaze pointer (green circle).
Development process
The object modeling and texture baking was created in Blender, where the 1m unit is used as base size; the models are exported individually, converted to CTM and loaded into the application via Three.js.
A couple of the models were created with Oculus Medium and later decimated with Meshlab.
A couple of Kinetic Sculptures were created directly with Three.js and a bit of Math knowledge.
IP_Enrich is a tool that given a IP address, it will query multiple security threat intelligence services and enrich the information of the IP with metadata and all the available information on it.
Note: certain services require adding API keys, like VirusTotal and PassiveTotal (RiskIQ).
Features
Extract VirusTotal data
Extract PassiveTotal data
Extract GeoIP data
Extract Shodan data
Outputs in a JSON format
Outputs a nice printed summary
Can be imported as a module
Roadmap
The following are a list of features that we aim to incorporate to IP Enrich in the future:
git clone https://github.com/stratosphereips/ip_enrich.git
cd ip_enrich
python3 ./ip_enrich.py -h
Second, install shodan python library
python -m pip install -r requirements.txt
Now it is ready to run without any API, but if you have any API (even free) from VirusTotal, RiskIQ (Passive Total), or Shodan, put them in their corresponding files. If not it will still run, but you will miss a lot of extra data. We suggest you register for those services and get a free API.


 https://github.com/repalash/threepipe


![[YouTube]](http://yamla.top/wp-content/uploads/2025/08/-YouTube_fab3F-ff0000)
![[Twitter]](http://yamla.top/wp-content/uploads/2025/08/-Twitter_@fab3F__official-1DA1F2)
![[Discord]](http://yamla.top/wp-content/uploads/2025/08/824334386786074634.svg)
![[Twitch]](http://yamla.top/wp-content/uploads/2025/08/-Twitch_@fab3F-6441a5)
![[GitHub]](http://yamla.top/wp-content/uploads/2025/08/GitHub_fab3F-171515)